Showing posts with label veggies. Show all posts

Monday, July 13, 2009

Pan-Fried Mystery

It may not look horribly appetizing, but all things considered, it wasn't bad!

Like many meat-eating american males in my age group (read: alive), my experience with tofu in the past has been somewhat limited. I've never really considered that a shame, but I've also never had the distaste towards the stuff that appears evident in those who are not vegetarians. However, while I don't despise the stuff, let's face it: meat tastes better. Thus, it should be noted that I used tofu in this dish simply to remain true to the recipe (and to experiment with an ingredient I rarely use); it could certainly be made with chicken or beef and probably have a bit more depth of both flavor and texture to it as a result.

When I first discovered this recipe, I earmarked it simply for the novelty. It seemed like a dish that would help ease my way into working with the gooey soy substance and, if it resulted in a failure, would still result in a mixture of beans, mushrooms, and sauce that would still be tasty. That said, the end product turned out fairly favorable; I'm not sure I'll be making it again (or at least not without some modifications), but it did help me develop some techniques that are fairly common in asian-style cuisines.

Tofu Stir-Fry with Snap Peas and Mushrooms
(Stolen entirely from The Kitchn)

Ingredients
For the sauce:
3/4c chicken or vegetable broth
3tbsp soy sauce
1tbsp rice wine vinegar
2tsp sugar
2tbsp corn starch

For the not-sauce:
5tbsp vegetable oil
1/3c corn starch
1 block (14oz) extra-firm tofu, cut into cubes
10oz small mushrooms, quartered
8oz snow peas
3 cloves garlic, minced
1 bunch green onions, chopped

Heat a standard wok or skillet to medium-high heat.

Procedure

Before starting work on any of the major ingredients, it's important to prepare the sauce. Mix the broth, soy sauce, vinegar, and sugar in a small bowl until the sugar has dissolved. Add the corn starch and whisk until it has incorporated. Set the mixture aside; it won't be used until near the end of the process.

Place the 1/3c corn starch into a small bowl and toss about half the tofu in the powder until well coated. Add about 1tbsp of the oil to the wok and let it heat up until just before the smoking point (if it starts smoking, just ease off the heat a bit). Place the tofu in the wok and let it sit for about a minute before attempting to move the pieces. Flip the pieces over completely to start cooking them on the other side, and let them fry for another minute. Remove them to a plate lined with a paper towel and repeat this entire process for the second half of the tofu chunks. Set the entire batch of tofu aside.

Add another tbsp of oil to the wok and let it heat back up. Add the mushrooms and fry, tossing or stirring frequently to prevent burning, until they have browned and shrunk to about 2/3 their size (they will be releasing moisture during this process; when no more steam is coming off, they are ready). Add the snow peas and garlic and continue tossing/stirring for another 10-15 seconds (longer won't hurt anything, but I prefer my vegetables nearly raw in most cases, so didn't see the need for a longer cook time).

Whisk the sauce mixture made at the start of all this to ensure that the starch re-distributes through the liquid and add it to the wok. Continue cooking, stirring periodically, to reduce the sauce to the consistency you desire (note, however, that the sauce will thicken as it cools as well, so err on the side of caution and don't overcook). Allow the sauce to come to just above room temperature before adding the onions and tofu; this will allow the sauce to continue to thicken, helping to reduce softening of the fried tofu. Additionally, green onions are better fresh, so we don't want the sauce to end up cooking them.

Serve alongside rice or by itself, according to your preference!

Lessons Learned
This was a fairly straightforward recipe; I must give credit to the folks at the Kitchn (or whoever they stole it from) for putting together a very good procedure to work with. That said, I found the tofu fairly bland; I might consider marinating it for a half hour or so in a flavorful broth of some sort to infuse a bit more into it. Also, the dish was very salty, and came across as imbalanced. I would've preferred a sweet note of some sort, perhaps adding some oyster or hoisin sauce to the mix to balance things out. A bit of heat might help as well, but I've never been a big fan of overly-spiced dishes either.

All things considered, I may give this recipe another shot with some meat instead of tofu, simply to see how things need to be changed in order to accomodate it.

Monday, September 15, 2008

Rainbow Roughage

Despite the rather pedestrian appearance of the meal above, it represents an experiment--a test, of sorts--that I am conducting upon myself, your faithful writer. As a personal challenge, I have taken it upon myself to pick up one ingredient--be it vegetable, meat, marinade, or anything in between--each week that I have never worked with before and put something together using it to what will hopefully turn out to be a palatable dish. So far... well, the important part is trying. And although this week's dish may not look beautiful, it was still edible, and not a bad first attempt, as far as I'm concerned.

As the title of this post may suggest, this week I picked up a bunch of rainbow chard, both because I'd been curious about it in the past and because colorful items rank just below shiny things on my list of personal distractions. Entering into this, I knew nothing about chard, regardless of its prismatic orientation, and determined to remedy the situation post-haste. Unfortunately, some quick internet research turned up a strange dearth of interesting chard-related recipes, none of which utilized anything I had on hand aside from the chard itself. Undaunted, I delved deeper into my pantry and decided that a bag of brown rice I had lying around would make a perfect side dish for the vegetable's finished product.

Having set the rice maker to "rice", I set off in search of protein. After a brief survey of my refrigerator's sparse contents, I emerged from the frosty wasteland with some leftover pork tenderloin and a bag of bean sprouts. I love bean sprouts, but they have the irritating tendency to spoil approximately 2 minutes after I pick them up off the shelf at the store; consequently, I had to use the damn things up before I had to throw yet another half-empty bag of them away. As for the pork... well, I needed protein, and pork tends to be fairly malleable when it comes to flavor. Ingredients in hand, I stared at them on the counter for a few minutes, mind a-whirling, in hopes of finding some inspiration. Given that I was hungry already, I decided a fast concoction would definitely be best. And what better fast-cooking method can there be than a stir-fry?

Stir-fried rainbow chard with pork tenderloin
(Well, it's not a real recipe, so I figured a descriptive title would be best)

Ingredients
1 Bunch rainbow chard, chopped
1 Leftover chunk of pork, sliced thin
1/2 Bag of bean sprouts
2tbsp Hoisin sauce
1tbsp Oyster sauce
1tbsp Soy sauce

Procedure
1) Heat 1 liter of water in a wok or large saucepan until it just reaches a boil.

2) Add the chopped chard and boil for 1 minute.

Ok, so it's not really all that fried. I figured boiling couldn't hurt, if it's really fast.

3) Remove the chard to a colander and allow to rest for a bit.


4) In the same pan, add the hoisin, oyster, and soy sauces and mix briefly. Add the pork and shake to coat.

Of course, the sauce choices will vary based on personal preferences.

5) Cook until the sauce has mostly disappeared.

This method works particularly well for meat that was undercooked to start with.

6) Add the bean sprouts to scoop up the remaining sauce and shake to combine. Or stir. I prefer shaking, as it's more impressive and reduces cleanup.


7) Remove from heat and add the chard back into the mix. Shake or stir to combine the ingredients. Serve alongside the rice prepared previously.


Lessons Learned
Chard is bitter. As such, I think it can benefit from strong flavor combinations; this dish was somewhat weak, and the chard came through very strongly. It still tasted good, but I might consider a stronger sauce if I made it again. Otherwise, it was a satisfying spur-of-the-moment dish, so I can't really complain. I can only hope my future experiments work out so smoothly.

Great Cukes of Fire

As my recent salsa post demonstrated, this Labor Day was a celebration of all things spicy (but not too spicy, as hot things make me cry like a little girl), and if you're anything like me, when you hear spice, you think "cucumbers"! No? Just me? Whatever.

Ok, in all honesty, I chose to add this recipe to my repertoire for two reasons:
1) I'm a cucumber fanatic. Cucumbers are almost as high up as corn on my list of things placed on this planet as proof that we are meant to be happy.
2) I saw a recipe for an enhanced version of the traditional boring cucumber salad that seemed suitable to my tastes.

Now since no stolen recipe would ever be complete before I have a chance to completely tweak the hell out of it, I stole the concept from the aforementioned recipe and then modified it with what I felt were improvements at the time. In retrospect, the original might be better in some regards, but I stand by my decisions. For those who are interested, compare the original recipe with my own; the alterations are rather apparent.

Better Cucumber Salad
(adapted from the Flexitarian Menu)

Ingredients
2 Medium cucumbers
2 Medium carrots
1 Bunch green onions
1 Medium yellow onion
4 Cloves garlic, minced
2tsp Sugar
1 Lime's worth of juice (about 1/3c)
2tsp Rice vinegar
1tsp Cayenne pepper
1/4c Chopped mint leaves (fresh, if at all possible)

Procedure
1) Slice the carrots and cucumbers into rounds as thin as possible (doesn't have to be translucent; just try to get them thin).

I like using a ridiculously large knife for such exercises.

2) Chop the yellow onion into half-circles (i.e., chop in half, then slice thinly) and soak the sliced results in cold water for about 10 minutes. This process reduces the harshness of the onion flavor; you can omit it if you don't mind the bite they bring.

3) In a large bowl, mix the sugar, lime juice, vinegar, pepper, garlic, and mint.

4) Add the carrots to the mixture and mix thoroughly.

I did the carrots first in hopes that the acids in the liquid would soften them a bit. This didn't work, of course.

5) Slice the green onion and add it along with the cucumbers to the bowl and mix again.

6) Strain the yellow onion slices and add them to the bowl. Mix thoroughly to get all ingredients coated with the flavorings.

Lessons Learned
My guests loved the flavor of the salad, but mentioned that the carrots were a bit tough to manage. In my next attempt, I'll try to lightly sautee the carrots in some butter until they *just* start to soften, and then use them as I did above. The idea is to get them to be only slightly crunchier than the cucumbers themselves. Still, I consider this recipe to be a great success, and it will indeed be repeated in the future.

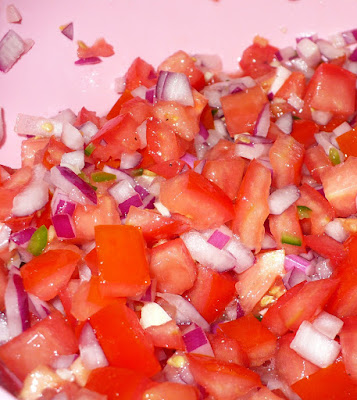
Fresh Tomato Salsa

Labor Day: That last hurrah before summer closes. Not that I'm ever particularly attached to summer, mind you; by the time September finally rolls around, I'm generally all-too ready for some pleasant fall weather (fall being my favorite season, but we needn't get into that here). However, I *am* always in support of getting a day off of work, and what better way to celebrate such a day than by having a few friends over with a large complement of snacks and grilled food?

This year being no exception, I had a strong craving for my favorite Mexican "dips": guacamole and, of course, salsa. I've never been terribly drawn to the salsas I've had made with cooked tomatoes, as I like the chunky fresh style. As such, I decided to see how easily I could put together a whole mess of it. As you may have guessed, it wasn't difficult, and yes, it was tasty. Now you may wonder exactly how much of a "recipe" there is to salsa, and I'm inclined to agree; that's why I simply referenced Simply Recipe's version for a basic shopping list before twisting things in my own way.

Fresh Tomato Salsa
(adapted from Simply Recipes)

Ingredients
5 Medium tomatoes (romas work great for this)
1 Red onion
3 Chiles (any type you desire)
3 Cloves of garlic, minced
1 Lime's worth of juice (about 1/3c)
1tbsp Olive oil
1/2c Chopped mint*
Salt to taste

*I use mint because I can't stand cilantro. Judge me if you will, but this actually turned out rather nice. Of course, purists will want to use cilantro instead. To each their own.

Procedure

1) Gather all your components together to make for quick and easy knife work.

Yes, I used 6 tomatoes. It was too many. Always use less than you think you'll need, as it's easier to add than remove them.

2) Dice all the vegetables to the size desired. Since individual tastes may vary, use your own judgement on the size of the chunks.

3) Add the olive oil, garlic, and lime juice and mix in a large bowl until well-blended. Add salt as desired, keeping in mind that the chips will probably also be salted.

Lessons Learned
You might think it's hard to ruin salsa. You're partially right; it's hard to completely destroy, but it's also rather hard (at least for me) to get *perfect*. This version was not it; I went heavy on the tomato and light on the spice. Next time, I'd reduce the tomato a bit and add another pepper (and probably use something stronger than jalapenos for spice). As a final modification, after it sat for a bit, the juice from the tomatoes came out and left a lovely puddle at the bottom for all the components to marinate in. Next time, I'd probably remove the juicy interior of the tomatoes and use just the fleshy components for texture and flavor. That probably also would've enhanced the strength of the spice, making for a better balance and more stability on the chip. Still, I ate the stuff, so it certainly wasn't all bad!

Friday, May 2, 2008

Onion Dip

Last weekend during the NFL draft, my roommate and I decided we needed a large quantity of junk food to properly celebrate the first real football-related action during the long drought that is known as the off-season. As part of this master plan, I determined to cobble together a mess of loose ingredients I had left over from various other projects into a functional dip. I've always enjoyed onion dip more than salsa or plain ranch, and since I had seen a recipe for it on TV recently, I decided to give it a shot.

Recipe stolen virtually unmodified from Good Eats.

Ingredients:
2 tablespoons olive oil
1 yellow onion, diced
4-5 green onions, diced
1 shallot, diced
1/4 teaspoon kosher salt
1 1/2 cups sour cream
3/4 cup mayonnaise
1/4 teaspoon garlic powder
3-4 grinds of pepper
1/2 teaspoon kosher salt

Heat a medium sautee pan on medium heat and add the oil. Once the oil is warmed, add the yellow onion, shallot, and 1/4tsp salt. Sweat the vegetables, stirring occasionally, until they are browned and soft (the linked recipe claims about 20 minutes; I left it for about 25 or so) and add the green onions. Sautee for another minute or two and remove from the heat to let the veggies cool. At this point, the onions should look like this:


While the onions cool, mix the sour cream and mayo in a mixing bowl until its thoroughly blended. Add garlic powder, salt, and pepper and mix again until the ingredients are incorporated, as shown below:


Mix the onions into the cream/mayo bowl and stir with a spatula until the vegetables have been distributed. Cover and refrigerate for at least an hour to let the flavors meld properly. Make sure to stir the mixture again before serving, just to loosen things up a little. Serves more than two, in my experience, and goes well with potato chips, veggies, or other things you dip into stuff.

Monday, April 14, 2008

Apple Cole Slaw

Despite the fact that many barbecue lovers would claim that good ribs can stand alone, I determined that at least one vegetable dish must be provided as an accompaniment to my previously-posted braised ribs. This assertion in combination with the head of cabbage sitting in my refrigerator produced the idea of one of my favorite vegetable dishes of my younger years: cole slaw.

Having never actually scrapped together my own version of the stuff, I decided that some research was in order. I drew inspiration from this recipe as well as several sources at FoodTV.com before finally settling on an amalgamation of all that I had found. Since I wanted a sweeter slaw, the apples (which I happened to also have in the fridge) would work perfectly for my meal with only slight modifications.

Ingredients:
1 medium head green cabbage, shredded (note: I picked a smallish one, as the smaller heads tend to be sweeter)
2 red delicious apples, diced
1/2 c mayonnaise
1/6 c brown sugar
1/6 c white sugar
2 tbsp lime juice (I didn't have any lemon on hand)
1 medium carrot, shredded (optional)
1 small onion, sliced into half-rings (optional)

Hardware:
1 medium mixing bowl

After chopping up all my ingredients in a flurry of frantic sweeps of a knife (with only minor cuts to myself, I might add), I swept them all aside to mix the sauce. (I used 1 of the tablespoons of lime juice on the diced apples to prevent browning before starting the sauce. While this step isn't necessary for the flavor, it certainly looks prettier).

Note: Before starting the sauce, I put the shredded cabbage into a colander and sprinkled it lightly with salt to help drain some of the moisture out. After 20-30 minutes, the cabbage still looks great, but has lost a fair amount of liquid. In my experience, this results in a less juicy slaw, but this step can be skipped for those who are in a hurry. As a bonus, this meant that I didn't have to add any salt to the recipe itself.

In the mixing bowl, dump the mayo, sugars, and remaining lime juice in and stir it up until you have a relatively uniform beige paste in the bowl. Drop the paste on top of the veggies and mix thoroughly (I used my hands for this step, but for the more squeamish about making a mess, a spatula works just as well). Cover and refrigerate for an hour or more before serving.

Lessons learned:
Hard to say; this recipe turned out fairly tasty, as far as I'm concerned. Next time I might increase the ratio of apples to cabbage; the apples were somewhat sparse as far as I'm concerned. Otherwise, a quick and easy recipe that I'd highly recommend.