Despite the rather pedestrian appearance of the meal above, it represents an experiment--a test, of sorts--that I am conducting upon myself, your faithful writer. As a personal challenge, I have taken it upon myself to pick up one ingredient--be it vegetable, meat, marinade, or anything in between--each week that I have never worked with before and put something together using it to what will hopefully turn out to be a palatable dish. So far... well, the important part is trying. And although this week's dish may not look beautiful, it was still edible, and not a bad first attempt, as far as I'm concerned.
As the title of this post may suggest, this week I picked up a bunch of rainbow chard, both because I'd been curious about it in the past and because colorful items rank just below shiny things on my list of personal distractions. Entering into this, I knew nothing about chard, regardless of its prismatic orientation, and determined to remedy the situation post-haste. Unfortunately, some quick internet research turned up a strange dearth of interesting chard-related recipes, none of which utilized anything I had on hand aside from the chard itself. Undaunted, I delved deeper into my pantry and decided that a bag of brown rice I had lying around would make a perfect side dish for the vegetable's finished product.
Having set the rice maker to "rice", I set off in search of protein. After a brief survey of my refrigerator's sparse contents, I emerged from the frosty wasteland with some leftover pork tenderloin and a bag of bean sprouts. I love bean sprouts, but they have the irritating tendency to spoil approximately 2 minutes after I pick them up off the shelf at the store; consequently, I had to use the damn things up before I had to throw yet another half-empty bag of them away. As for the pork... well, I needed protein, and pork tends to be fairly malleable when it comes to flavor. Ingredients in hand, I stared at them on the counter for a few minutes, mind a-whirling, in hopes of finding some inspiration. Given that I was hungry already, I decided a fast concoction would definitely be best. And what better fast-cooking method can there be than a stir-fry?
Stir-fried rainbow chard with pork tenderloin
(Well, it's not a real recipe, so I figured a descriptive title would be best)
Ingredients
1 Bunch rainbow chard, chopped
1 Leftover chunk of pork, sliced thin
1/2 Bag of bean sprouts
2tbsp Hoisin sauce
1tbsp Oyster sauce
1tbsp Soy sauce
Procedure
1) Heat 1 liter of water in a wok or large saucepan until it just reaches a boil.
2) Add the chopped chard and boil for 1 minute.
3) Remove the chard to a colander and allow to rest for a bit.
4) In the same pan, add the hoisin, oyster, and soy sauces and mix briefly. Add the pork and shake to coat.
5) Cook until the sauce has mostly disappeared.
6) Add the bean sprouts to scoop up the remaining sauce and shake to combine. Or stir. I prefer shaking, as it's more impressive and reduces cleanup.
7) Remove from heat and add the chard back into the mix. Shake or stir to combine the ingredients. Serve alongside the rice prepared previously.
Lessons Learned
Chard is bitter. As such, I think it can benefit from strong flavor combinations; this dish was somewhat weak, and the chard came through very strongly. It still tasted good, but I might consider a stronger sauce if I made it again. Otherwise, it was a satisfying spur-of-the-moment dish, so I can't really complain. I can only hope my future experiments work out so smoothly.
Monday, September 15, 2008
Custard Crackup
My affinity for cheescake may not be well-documented, but rest assured, I consider it one of the greatest sweet creations since the development of pie. For those of you who are pointing out that a cheesecake is basically a cream pie made with cheese, you're absolutely correct; does that make me wrong? Pie is the single greatest thing in the universe; it is to food what Chuck Norris is to an average human. Pie has the capacity to end wars, right wrongs, and leap tall buildings with a single bound, all while still being delicious in every single form (with the possible exception of pumpkin, but I'm willing to let that one slide).
But I'm not here to talk about pie. Well, not entirely (just watch for future entries!); instead, I'll continue with the pie that is cheesecake. It should be pointed out that I do not own a springform pan. I hate the things; they're messy, they leak, and they serve only a single purpose (delightful though that purpose may be). As such, all my cheesecake creations thus far have resided in a single 9x9" square pan. Is it the best vessel to bake and display the greatness that is the cake (or pie!) of cheese? Most certainly not. Does it get the job done? So far, yes.
With that out of the way, my last adventure with cheesecake (which went sadly undocumented) led me to discover that some recipes call for cheeses *other* than cream cheese. As this had never occurred to me before, I had to investigate further, and, of course, test out these recipes for myself. I've never been a big fan of ricotta cheese; to me, it tends to be bland, lifeless, and I really don't like the texture, as it's not what I expect when I think "cheese". As such, it was a perfect candidate for my cheesecake experiment. And so, after some lengthy research, I settled on stealing a recipe from FoodTV's resident female Italian food expert, Giada. It should be noted that I took some liberties with the actual ingredients, but I stayed more or less true to the recipe itself.
Ricotta Cheesecake
(heisted from Giada de Laurentiis)
Ingredients
Crust
2c Rolled oats (ground coarsely in processor or blender)
1c Brown sugar
1c Butter (melted)
Custard
6tbsp Butter, melted
16oz Ricotta
16oz Cream cheese
3/4c Sugar
1/4c Honey
1tbsp Lemon zest
4 eggs
Preheat oven to 350F
Procedure
1) In a large bowl, mix the ground oats and the brown sugar thoroughly. Add the butter and mix until it comes together.
2) Press the crust into the bottom of a greased 9x9" pan and bake at 350F for 15 minutes.
3) Remove and set aside to cool. Be sure to cool the crust for at least 10-15 minutes before adding the cheesecake mixture!
4) In a mixer bowl, mix the ricotta on its own until it is reasonably creamy. Add the cream cheese and mix thoroughly.
5) After the cheeses have mixed a bit, slowly add the sugar, honey, and lemon zest.
6) Add the eggs, one at a time, and mix until thoroughly blended.
7) Pour the mixture onto the prepared crust and bake at 350F for about an hour. Start checking it at around the 45 minute mark, as some ovens will vary. It's ready to come out when the center jiggles slightly and still resembles a liquid, but the outside is firm.
8) Allow the cheesecake to cool to room temperature on the counter, then refrigerate for at *least* 4 hours. Overnight works better.
Lessons Learned
As seen in the first image of this post, this recipe taught me the value of adding that pan of water that most cheesecake recipes call for during baking. I didn't mind the cracked-ness of the end product, and it still tasted good. That said, I don't care much for the honey flavor of it; I prefer a pure cheesecake flavor. Overall, I really didn't notice much difference using ricotta instead of all cream cheese, so I probably won't bother doing it again, as cream cheese is far cheaper than ricotta these days.
Labels:
cream cheese,
Dessert,
gluten-free,
lemon
Great Cukes of Fire
As my recent salsa post demonstrated, this Labor Day was a celebration of all things spicy (but not too spicy, as hot things make me cry like a little girl), and if you're anything like me, when you hear spice, you think "cucumbers"! No? Just me? Whatever.
Ok, in all honesty, I chose to add this recipe to my repertoire for two reasons:
1) I'm a cucumber fanatic. Cucumbers are almost as high up as corn on my list of things placed on this planet as proof that we are meant to be happy.
2) I saw a recipe for an enhanced version of the traditional boring cucumber salad that seemed suitable to my tastes.
Now since no stolen recipe would ever be complete before I have a chance to completely tweak the hell out of it, I stole the concept from the aforementioned recipe and then modified it with what I felt were improvements at the time. In retrospect, the original might be better in some regards, but I stand by my decisions. For those who are interested, compare the original recipe with my own; the alterations are rather apparent.
Better Cucumber Salad
(adapted from the Flexitarian Menu)
Ingredients
2 Medium cucumbers
2 Medium carrots
1 Bunch green onions
1 Medium yellow onion
4 Cloves garlic, minced
2tsp Sugar
1 Lime's worth of juice (about 1/3c)
2tsp Rice vinegar
1tsp Cayenne pepper
1/4c Chopped mint leaves (fresh, if at all possible)
Procedure
1) Slice the carrots and cucumbers into rounds as thin as possible (doesn't have to be translucent; just try to get them thin).
2) Chop the yellow onion into half-circles (i.e., chop in half, then slice thinly) and soak the sliced results in cold water for about 10 minutes. This process reduces the harshness of the onion flavor; you can omit it if you don't mind the bite they bring.
3) In a large bowl, mix the sugar, lime juice, vinegar, pepper, garlic, and mint.
4) Add the carrots to the mixture and mix thoroughly.
5) Slice the green onion and add it along with the cucumbers to the bowl and mix again.
6) Strain the yellow onion slices and add them to the bowl. Mix thoroughly to get all ingredients coated with the flavorings.
Lessons Learned
My guests loved the flavor of the salad, but mentioned that the carrots were a bit tough to manage. In my next attempt, I'll try to lightly sautee the carrots in some butter until they *just* start to soften, and then use them as I did above. The idea is to get them to be only slightly crunchier than the cucumbers themselves. Still, I consider this recipe to be a great success, and it will indeed be repeated in the future.
Ok, in all honesty, I chose to add this recipe to my repertoire for two reasons:
1) I'm a cucumber fanatic. Cucumbers are almost as high up as corn on my list of things placed on this planet as proof that we are meant to be happy.
2) I saw a recipe for an enhanced version of the traditional boring cucumber salad that seemed suitable to my tastes.
Now since no stolen recipe would ever be complete before I have a chance to completely tweak the hell out of it, I stole the concept from the aforementioned recipe and then modified it with what I felt were improvements at the time. In retrospect, the original might be better in some regards, but I stand by my decisions. For those who are interested, compare the original recipe with my own; the alterations are rather apparent.
Better Cucumber Salad
(adapted from the Flexitarian Menu)
Ingredients
2 Medium cucumbers
2 Medium carrots
1 Bunch green onions
1 Medium yellow onion
4 Cloves garlic, minced
2tsp Sugar
1 Lime's worth of juice (about 1/3c)
2tsp Rice vinegar
1tsp Cayenne pepper
1/4c Chopped mint leaves (fresh, if at all possible)
Procedure
1) Slice the carrots and cucumbers into rounds as thin as possible (doesn't have to be translucent; just try to get them thin).
2) Chop the yellow onion into half-circles (i.e., chop in half, then slice thinly) and soak the sliced results in cold water for about 10 minutes. This process reduces the harshness of the onion flavor; you can omit it if you don't mind the bite they bring.
3) In a large bowl, mix the sugar, lime juice, vinegar, pepper, garlic, and mint.
4) Add the carrots to the mixture and mix thoroughly.
I did the carrots first in hopes that the acids in the liquid would soften them a bit. This didn't work, of course.
5) Slice the green onion and add it along with the cucumbers to the bowl and mix again.
6) Strain the yellow onion slices and add them to the bowl. Mix thoroughly to get all ingredients coated with the flavorings.
Lessons Learned
My guests loved the flavor of the salad, but mentioned that the carrots were a bit tough to manage. In my next attempt, I'll try to lightly sautee the carrots in some butter until they *just* start to soften, and then use them as I did above. The idea is to get them to be only slightly crunchier than the cucumbers themselves. Still, I consider this recipe to be a great success, and it will indeed be repeated in the future.
Fresh Tomato Salsa
Labor Day: That last hurrah before summer closes. Not that I'm ever particularly attached to summer, mind you; by the time September finally rolls around, I'm generally all-too ready for some pleasant fall weather (fall being my favorite season, but we needn't get into that here). However, I *am* always in support of getting a day off of work, and what better way to celebrate such a day than by having a few friends over with a large complement of snacks and grilled food?
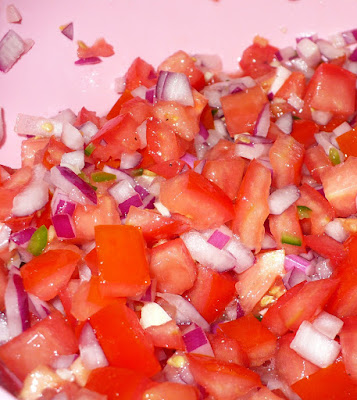
This year being no exception, I had a strong craving for my favorite Mexican "dips": guacamole and, of course, salsa. I've never been terribly drawn to the salsas I've had made with cooked tomatoes, as I like the chunky fresh style. As such, I decided to see how easily I could put together a whole mess of it. As you may have guessed, it wasn't difficult, and yes, it was tasty. Now you may wonder exactly how much of a "recipe" there is to salsa, and I'm inclined to agree; that's why I simply referenced Simply Recipe's version for a basic shopping list before twisting things in my own way.
Fresh Tomato Salsa
(adapted from Simply Recipes)
Ingredients
5 Medium tomatoes (romas work great for this)
1 Red onion
3 Chiles (any type you desire)
3 Cloves of garlic, minced
1 Lime's worth of juice (about 1/3c)
1tbsp Olive oil
1/2c Chopped mint*
Salt to taste
*I use mint because I can't stand cilantro. Judge me if you will, but this actually turned out rather nice. Of course, purists will want to use cilantro instead. To each their own.
Procedure
1) Gather all your components together to make for quick and easy knife work.
2) Dice all the vegetables to the size desired. Since individual tastes may vary, use your own judgement on the size of the chunks.
3) Add the olive oil, garlic, and lime juice and mix in a large bowl until well-blended. Add salt as desired, keeping in mind that the chips will probably also be salted.
Lessons Learned
You might think it's hard to ruin salsa. You're partially right; it's hard to completely destroy, but it's also rather hard (at least for me) to get *perfect*. This version was not it; I went heavy on the tomato and light on the spice. Next time, I'd reduce the tomato a bit and add another pepper (and probably use something stronger than jalapenos for spice). As a final modification, after it sat for a bit, the juice from the tomatoes came out and left a lovely puddle at the bottom for all the components to marinate in. Next time, I'd probably remove the juicy interior of the tomatoes and use just the fleshy components for texture and flavor. That probably also would've enhanced the strength of the spice, making for a better balance and more stability on the chip. Still, I ate the stuff, so it certainly wasn't all bad!
This year being no exception, I had a strong craving for my favorite Mexican "dips": guacamole and, of course, salsa. I've never been terribly drawn to the salsas I've had made with cooked tomatoes, as I like the chunky fresh style. As such, I decided to see how easily I could put together a whole mess of it. As you may have guessed, it wasn't difficult, and yes, it was tasty. Now you may wonder exactly how much of a "recipe" there is to salsa, and I'm inclined to agree; that's why I simply referenced Simply Recipe's version for a basic shopping list before twisting things in my own way.
Fresh Tomato Salsa
(adapted from Simply Recipes)
Ingredients
5 Medium tomatoes (romas work great for this)
1 Red onion
3 Chiles (any type you desire)
3 Cloves of garlic, minced
1 Lime's worth of juice (about 1/3c)
1tbsp Olive oil
1/2c Chopped mint*
Salt to taste
*I use mint because I can't stand cilantro. Judge me if you will, but this actually turned out rather nice. Of course, purists will want to use cilantro instead. To each their own.
Procedure
1) Gather all your components together to make for quick and easy knife work.
Yes, I used 6 tomatoes. It was too many. Always use less than you think you'll need, as it's easier to add than remove them.
2) Dice all the vegetables to the size desired. Since individual tastes may vary, use your own judgement on the size of the chunks.
3) Add the olive oil, garlic, and lime juice and mix in a large bowl until well-blended. Add salt as desired, keeping in mind that the chips will probably also be salted.
Lessons Learned
You might think it's hard to ruin salsa. You're partially right; it's hard to completely destroy, but it's also rather hard (at least for me) to get *perfect*. This version was not it; I went heavy on the tomato and light on the spice. Next time, I'd reduce the tomato a bit and add another pepper (and probably use something stronger than jalapenos for spice). As a final modification, after it sat for a bit, the juice from the tomatoes came out and left a lovely puddle at the bottom for all the components to marinate in. Next time, I'd probably remove the juicy interior of the tomatoes and use just the fleshy components for texture and flavor. That probably also would've enhanced the strength of the spice, making for a better balance and more stability on the chip. Still, I ate the stuff, so it certainly wasn't all bad!
Subscribe to:
Posts (Atom)